In this tutorial, you are going to build a simple duty recorder.
The mechanism is pretty simple: Arduino sends RFID data to Raspberry Pi 4B. You only need to buy a RFID-RC522 card reader + Raspberry Pi 4B +Arduino uno + jumper wires.
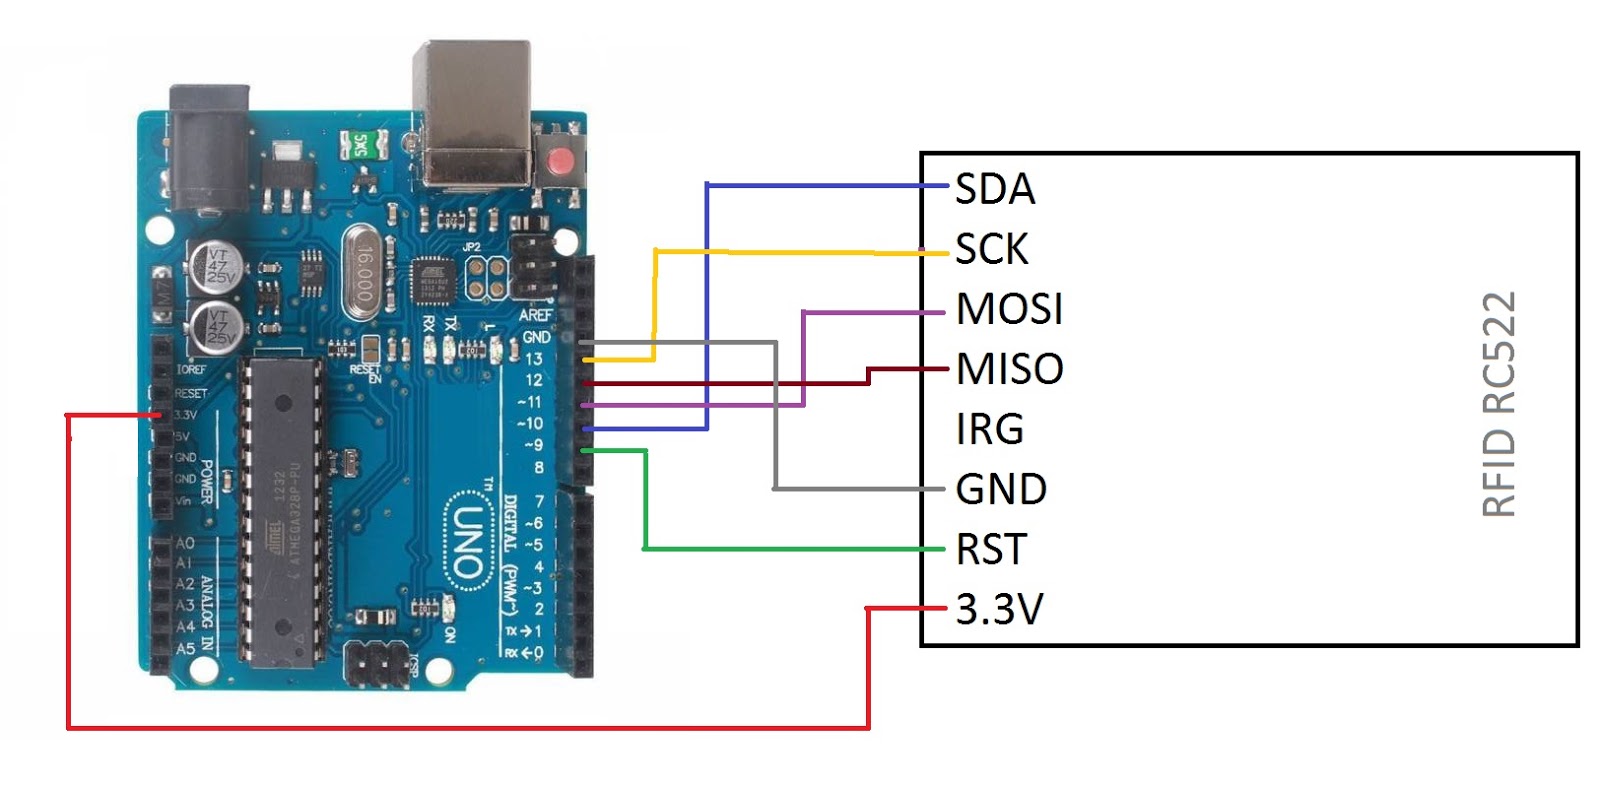
Step 1: Connect the card reader to arduino as follows.
Step 2: The arduino and Raspberry Pi are connected by USB serial port. If you haven't install arduino on Raspberry Pi, type "sudo apt-get update && sudo apt-get install arduino" in the Pi terminal.
Step 3: Check if the RFID library was installed in arduino
Click Sketch >> Include Library. If the RFID library was installed, MFRC522 should be seen.
Otherwise please install the RFID linrary via Sketch >> Include Library >> Manage Libraries. Then search MFRC522
Step 4: Open DumpInfo.ino under Examples >> MFRC522.
Step 5: Open the serial monitor and scan your white RFID card. You should see the UID. Here i hide the UID as xx xx xx xx .
Step 6: Upload the following code to arduino
#include <SPI.h>
#include <MFRC522.h>
#define RST_PIN 9
#define SS_PIN 10
MFRC522 mfrc522(SS_PIN, RST_PIN);
void setup()
{
Serial.begin(9600);
SPI.begin();
mfrc522.PCD_Init();
Serial.println("Duty recorder");
}
void loop()
{
if ( ! mfrc522.PICC_IsNewCardPresent())
{
return;
}
if ( ! mfrc522.PICC_ReadCardSerial())
{
return;
}
String content= "";
byte letter;
for (byte i = 0; i < mfrc522.uid.size; i++)
{
content.concat(String(mfrc522.uid.uidByte[i] < 0x10 ? " 0" : " "));
content.concat(String(mfrc522.uid.uidByte[i], HEX));
}
content.toUpperCase();
if (content.substring(1) == "xx xx xx xx") // change the UID of the card to give access
{
Serial.println("Staff(Roy WCH) starts to work");
delay(3000);
}
else
{
Serial.println("Access denied");
delay(3000);
}
}
Step 7: Write a very simple python code in Raspberry Pi. Then press F5.
You have two cards:
Card A is registered the UID of the staff whose name is called Roy WCH. When card A is put near to the card reader, it shows a message that "Staff (Roy WCH) starts to work".
Card B is not activated and therefore it shows "Access denied"
*The above code are modified from open source platform
The mechanism is pretty simple: Arduino sends RFID data to Raspberry Pi 4B. You only need to buy a RFID-RC522 card reader + Raspberry Pi 4B +Arduino uno + jumper wires.
Step 1: Connect the card reader to arduino as follows.
Step 2: The arduino and Raspberry Pi are connected by USB serial port. If you haven't install arduino on Raspberry Pi, type "sudo apt-get update && sudo apt-get install arduino" in the Pi terminal.
Step 3: Check if the RFID library was installed in arduino
Click Sketch >> Include Library. If the RFID library was installed, MFRC522 should be seen.
Otherwise please install the RFID linrary via Sketch >> Include Library >> Manage Libraries. Then search MFRC522
Step 4: Open DumpInfo.ino under Examples >> MFRC522.
Step 5: Open the serial monitor and scan your white RFID card. You should see the UID. Here i hide the UID as xx xx xx xx .
Step 6: Upload the following code to arduino
#include <SPI.h>
#include <MFRC522.h>
#define RST_PIN 9
#define SS_PIN 10
MFRC522 mfrc522(SS_PIN, RST_PIN);
void setup()
{
Serial.begin(9600);
SPI.begin();
mfrc522.PCD_Init();
Serial.println("Duty recorder");
}
void loop()
{
if ( ! mfrc522.PICC_IsNewCardPresent())
{
return;
}
if ( ! mfrc522.PICC_ReadCardSerial())
{
return;
}
String content= "";
byte letter;
for (byte i = 0; i < mfrc522.uid.size; i++)
{
content.concat(String(mfrc522.uid.uidByte[i] < 0x10 ? " 0" : " "));
content.concat(String(mfrc522.uid.uidByte[i], HEX));
}
content.toUpperCase();
if (content.substring(1) == "xx xx xx xx") // change the UID of the card to give access
{
Serial.println("Staff(Roy WCH) starts to work");
delay(3000);
}
else
{
Serial.println("Access denied");
delay(3000);
}
}
Step 7: Write a very simple python code in Raspberry Pi. Then press F5.
You have two cards:
Card A is registered the UID of the staff whose name is called Roy WCH. When card A is put near to the card reader, it shows a message that "Staff (Roy WCH) starts to work".
Card B is not activated and therefore it shows "Access denied"


Comments
Post a Comment